If you own an iPhone or iPad, then with the Stop Motion Studio app, you have a powerful tool for your next movie in hand.
With the app, you can easily create your stop motion movie on your iPhone or iPad. You can even add sound effects, background music and special effects. And with features like manual exposure and onion skinning, your animation looks guaranteed to be perfect and smooth.
Before we start, you’ll need to download the Stop Motion Studio Pro app on the App Store. You can also start with the free version of Stop Motion Studio and then buy additional packages for more features.
With its advanced features and clear user interface, Stop Motion Studio Pro is probably the best stop motion app for iPhone and iPad on the App Store.
Starting the Project
When you open the app for the first time, you will be taken to the project window. There you can see a sample project, but you can also start with a click on the plus icon your first movie.
When you’ve created your project, tap the camera icon to start recording!
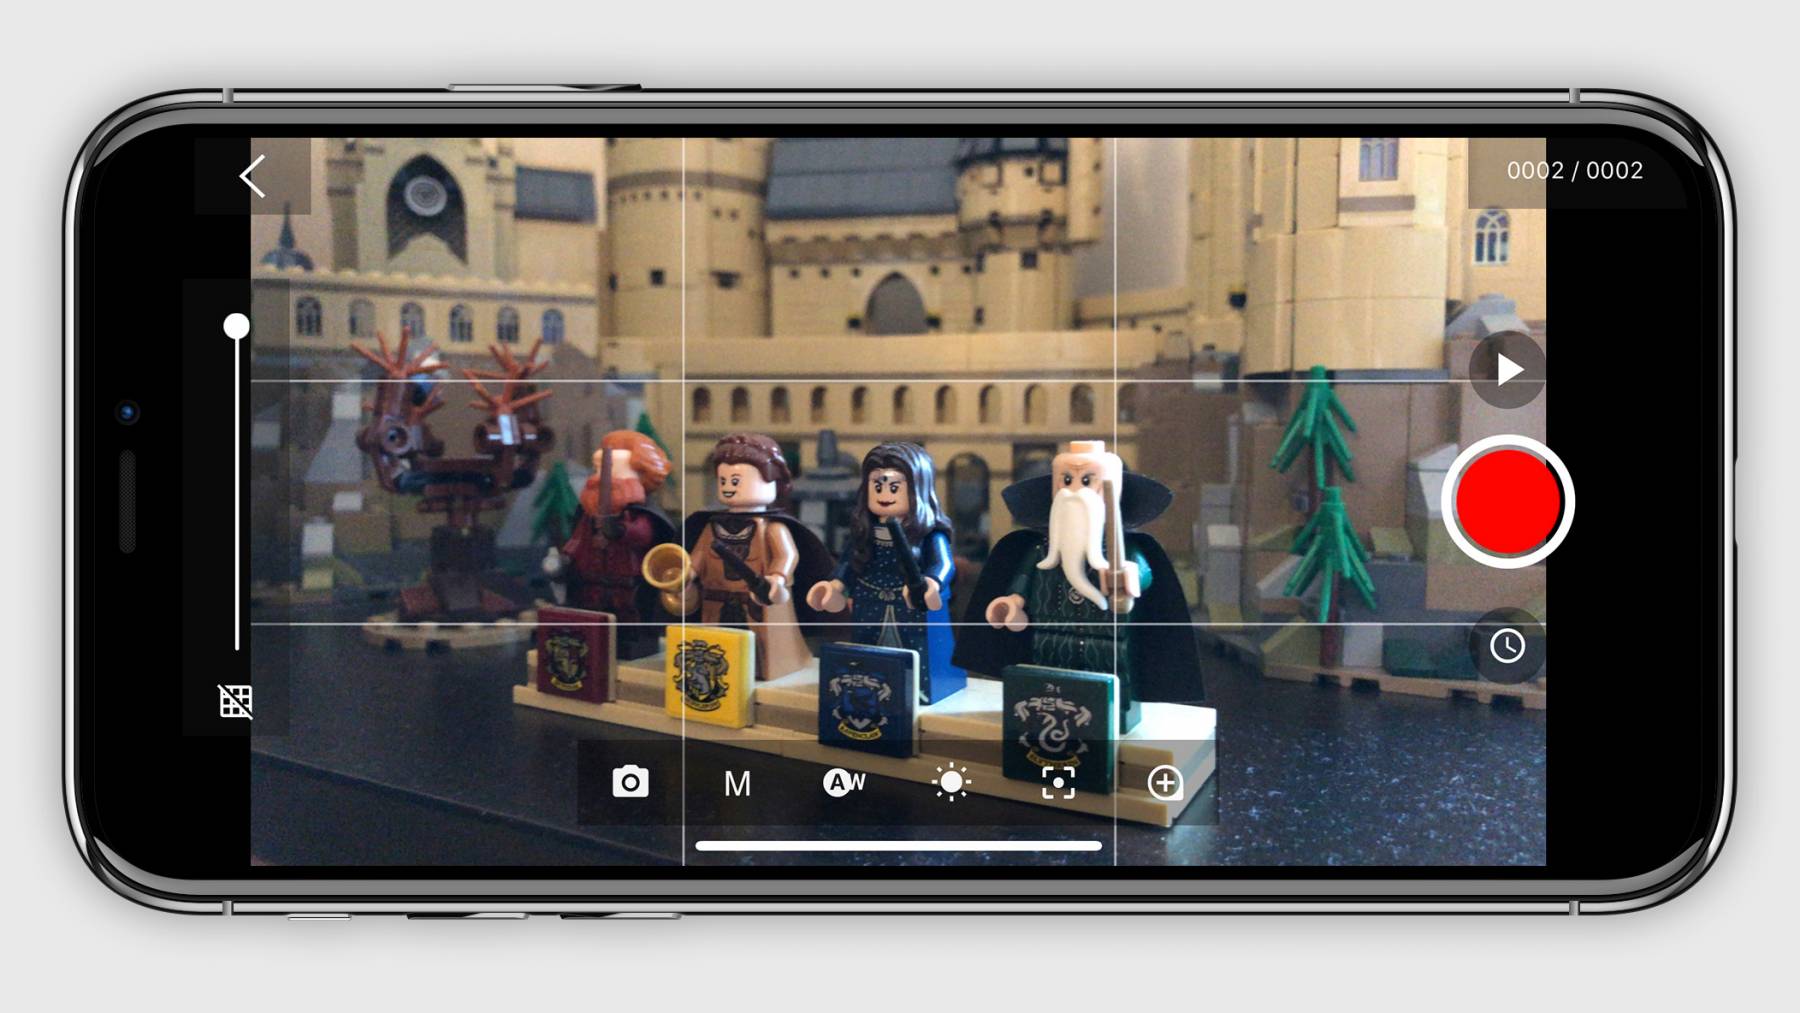
Here you can see a preview of your first picture. But before you start, you should still check the settings. These can be found in the lower menu bar.
By default, the app will pick up in automatic mode, you can change that by tapping the M button. At the beginning I would recommend the AL mode, where you can set the exposure (ie brightness) and the focus (ie the sharpness) by tapping on the image. So you can set up your image before shooting and the settings will not change during the shoot. In the automatic mode, it may be that the brightness changes between the pictures. That’s what you see in the finished movie as an ugly flickering!
On the picture above you can see that I put a grid over the preview image. You can show this with the small button on the left side and it helps you to compose the picture nicely. Align important elements (such as your actors) at the intersections of the lines!
If you have everything set, then you can moor a smartphone. Either you use a tripod for this, or you build your own holder. It is important that the device does not move unintentionally during the shoot!
Taking Pictures
The settings are all set, the iPhone is fixed and the set is ready. Now you can finally start shooting! Tap the red record button to shoot your first photo. In the upper right corner of the screen you can see that the number of pictures has changed to 0001.
Now you move your figures a little bit. So that you can check how much you have changed in the scene since the last picture, there is the so-called Onion Skin function. Onion Skin is English for onion skin and it allows you to semi-transparently overlay the previously captured image over the live preview. To do this, move the slider on the left side downwards, approximately to the middle. Now when you move your hand into the picture you can see that it is half transparent. So you can control exactly which figures you have already moved.
Edit your movie
When you’re done recording, you can switch back to the project window with the arrow at the top left. Here you can see a preview of your movie, as well as some tools to further edit it.

In the project window you can see an overview of all taken photos. Swipe allows you to navigate the Timeline and select images. If you tap on the currently selected, color-coded image, open more tools. Here you can edit, move or delete the image.
General project settings can be found under the gear icon. Here you can set the speed with which your pictures are played. The speed is specified in frames per second (FPS) and can be easily adjusted with a slider. You can also change the quality (HD, 4K) or aspect ratio (Square, 16: 9, Cinema) and add filters or foregrounds. Your imagination knows no boundaries!
Add Title and Credits
Of course, a real movie needs a title and a credits! To do this, move the Timeline in the Project window to where you want to insert a text. Then tap the plus symbol and then title and credits. It opens an overview with many different presets, which you can insert with a tap. Then you can adjust the text and the position and size in the image editor.
Sound Recording and Movie Score
Stop Motion Studio Pro not only lets you capture and edit images. With the built-in audio tools you can complete the movie with the same sound effects, music and dialogue recordings.
In the Project window, tap the plus icon to add an audio file. You can choose from a few included effects and tunes, or you can add your own files from iCloud Drive or Dropbox. The selected soundtrack will then play from the currently selected image.
You can also make your characters talk. To do this, tap the microphone icon in the project window to record a soundtrack yourself. Your movie will then be played and you can speak the voices of your characters according to the current plot.
Soundtracks are always pinned to the image from which they begin and they are marked in the timeline as a blue musical note. You can tap the icon and then select Sound on the toolbar to edit the soundtrack. You can change the volume or add effects to make your voice sound like a robot. Let your creativity flow!
Export your Masterpiece
Of course, if you are satisfied with your movie, you have to export it and share it with your friends! To do this, switch back to the start screen from the project window with the arrow symbol in the upper left corner. Here you can see an overview of all your projects. Long tap on the desired project to select it. In the blue toolbar you can now use the Share icon to export and share your movie. You can send the finished stop motion movie directly via iMessage or WhatsApp, save it in your photo library, Dropbox or iCloud or transfer it via AirDrop to your Mac.
Now you just need popcorn, and your movie premiere is ready to begin!
great thanks for the overview. i’ve been wanting to do this for awhile
Thank you for the article. Can you say what are the maximum output resolutions and what formats you can export to other than just social media sharing ?
Hi Marc, glad I could help. Videos can be exported in 4K 3840p oder HD 1080p resolution, the export format is QuickTime (h264). If you need a higher quality, you can also export an image sequence, which you can render in any format you like on your computer.