You want your stop motion movies to look even more professional? On this page, you’ll learn how to avoid flickering with the right settings.
By default, compact and DSLR (digital SLR) cameras do the most work for you during photography. That’s great if you just want to take a snapshot, but it can be very bothersome if you want to have full control of the camera in a stop motion movie (and have to!). If the camera chooses all the settings themselves, they can be a bit different for each image and the images are different bright. In the finished movie, you can see that as an ugly flicker.
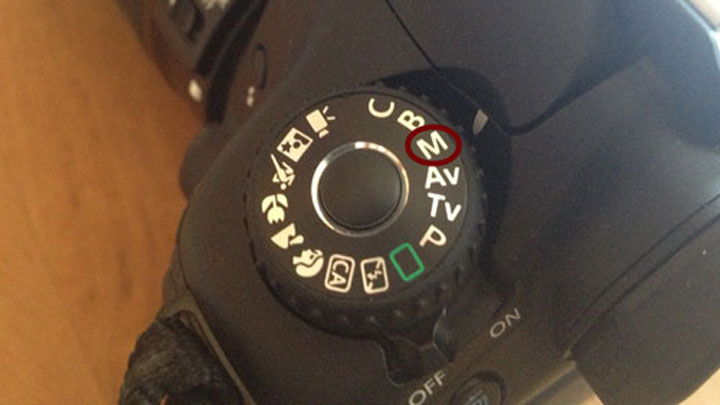
That’s exactly what most cameras have manual mode for. Mostly you can find it by the menu wheel under the letter M.
In manual mode you have full control over the most important settings of your camera: shutter speed, aperture and ISO number. Never heard of it? Do not worry, it’s not that hard.
Generally speaking, the brightness, ie the exposure, of the image depends on these three factors:
- the longer the exposure, the brighter the picture becomes
- the higher the f-number, the darker the picture gets
- the higher the ISO number, the brighter the picture becomes
1. The Shutter Speed
The shutter speed is the amount of time that light falls on the camera’s sensor. The longer this time, the more the image is exposed. The exposure time is given in seconds and a typical value is for example 1/200. If you set the shutter speed too long (about 1/40), there is a risk of blurring the picture.
2. The F-Number
The iris controls how much light can fall through the lens on the image sensor. The smaller the f-number, the farther the aperture is opened, the more light falls on the sensor and thus the picture is also exposed more.
Especially with your stop motion movies, the aperture plays a second important role: With it you can control the size of the focus area and the depth of field. If you want to have the foreground and background blurred to emphasize your main subject (see depth of field), you should choose the lowest possible f-number.
3. The ISO Number
The ISO number just indicates the sensitivity with which the image sensor reacts to light, so the higher you select the ISO number, the more responsive the sensor and the brighter the image. However, this also has a big disadvantage: If the sensor does not get enough light at a high ISO number, it “invents” the missing information. This creates a noisy picture with wrong pixels. So choose the ISO number as low as possible. Most of the time, 100 is the lowest value, but depending on the features and quality of your camera you can if necessary go to under 1000.
With these three parameters, you can now control the exposure of the images exactly. But how do you know that you chose the right combination of these parameters?
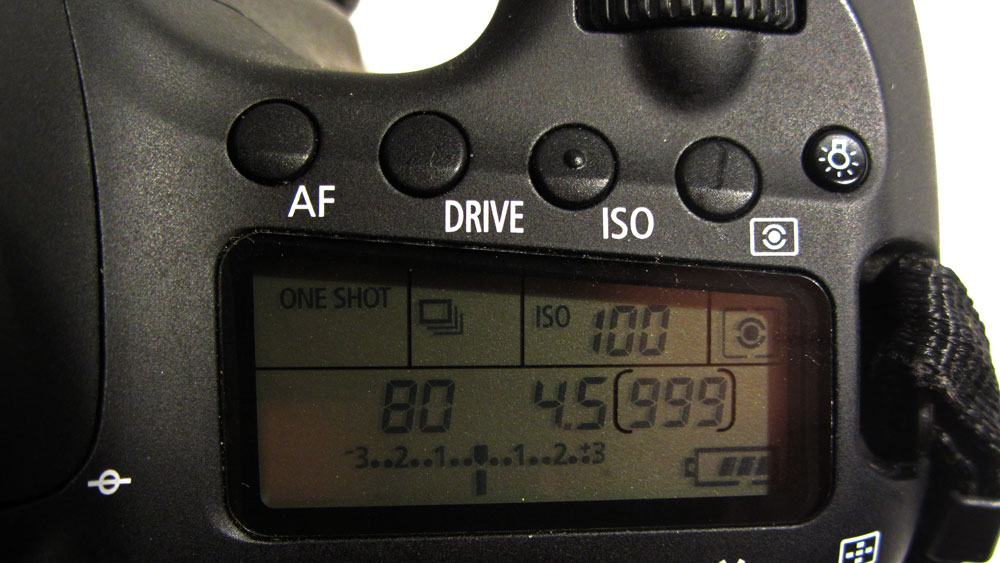
Conveniently, there is an indicator in manual mode for this. For DSLRs you will usually find them on a separate display, with normal compact cameras, they will appear on the main screen.
If the meter’s pointer is exactly in the middle, then you have chosen a correct combination of settings.
In the specific case of a stop motion film with a well-lit set, that means that you’ve chosen the lowest ISO and f-number and then adjusted the exposure accordingly.
You are interested in camera technology and you want to deal with it more closely? On besserfotografieren.com you can find more information about camera technology and photography.